Updated Kraken Guide: Mastering Full Dead Sails
If you loved Dead Rails on Sails, you'll be thrilled with the new update, despite its challenges. Mastering the Seven Seas and defeating the tentacled beast might seem daunting, but fear not. With this comprehensive Dead Sails Kraken guide, you'll navigate the fresh content, accelerate your progression, and amplify your enjoyment.
Recommended Videos
Table of contents
- Dead Sails Kraken Boss Guide
- Dead Sails Kraken Tips And Tricks
- How to Defeat the Kraken Boss in Dead Sails Kraken
Dead Sails Kraken Boss Guide
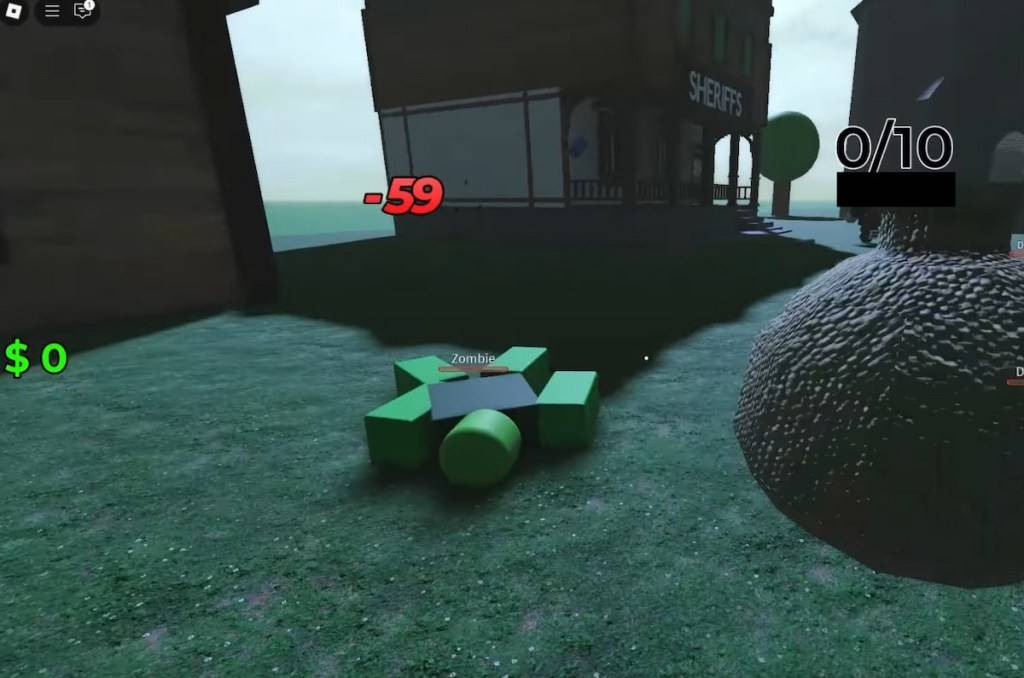
Your adventure begins in the heart of town, directly across from the Gun Store and Hospital, and in front of the Trading Hut. Start by offloading any excess loot and arming yourself. I recommend a Rifle—it's only $75 and packs enough punch to fend off enemies for a while. Don't forget to purchase coal to power your boat's old-school engine.
 Screenshot by Destructoid
The next town is 10,000m away. Simply kickstart your boat and you'll be on your way. You can stop to take down and loot Zombies and Drowned, but it's not always worth it due to the scarcity of valuables in the side houses. To restart your ship, just add more coal. Ignore the worm on the right side; it's harmless. Wait until the second safe zone to sell your loot, and watch out for Big Foot and Zombie mobs on both sides of the river.
 Screenshot by Destructoid
After the second safe zone/town, you'll encounter burning buildings teeming with mobs. Clear them if you're with friends; otherwise, it's not worth the time due to scattered spawn points. Around 12,000m, you'll find a castle-like house filled with Drowned, but also stocked with Shotgun ammo and other valuable loot. Use these resources wisely.
 Screenshot by Destructoid
Dead Sails Kraken Tips And Tricks
By now, you're familiar with the routine—kill, loot, repeat, and hope for enemy defeat. This is the core gameplay loop, but to excel, focus on efficiency. Use your boat as your primary inventory, emptying your bag upon return to save time and space.
 Screenshot by Destructoid
A helpful tip from this guide is stacking Zombies near the incinerator. Although the urge to escape those backwater towns is strong, efficient loot stacking pays off. Running low on fuel? Toss a few Zombies into the incinerator and you're set.
 Screenshot by Destructoid
Another useful tip is to be cautious in Sherrif's offices. They often harbor a high concentration of mobs, but the rewards in weapons and ammo are worth it. I sustained my shotgun for a long time by having a friend clear the ground floor in each town we explored.
 Screenshot by Destructoid
Save your ammo, weapons, fuel, and medkits for the fortress at around 25,000m. It's still under construction, making it a prime spot for ambushes. I advise against going alone; a group of at least three, ideally five, is best. Be efficient when collecting loot here.
 Screenshot by Destructoid
Do not engage Big Feet after 30,000m. They're incredibly strong, require a lot of ammo to defeat safely, and can hit like a brick wall. Plan your stops wisely—loot isn't everything.
The town after 50,000m is a prime farming spot. It's home to at least two dozen Drowned and Zombies, making it ideal for those with Shotguns or a Sawnoff. It's also efficient for gathering corpses for fuel, so coordinate with your team to prepare bodies for loading quickly.
How to Defeat the Kraken Boss in Dead Sails Kraken
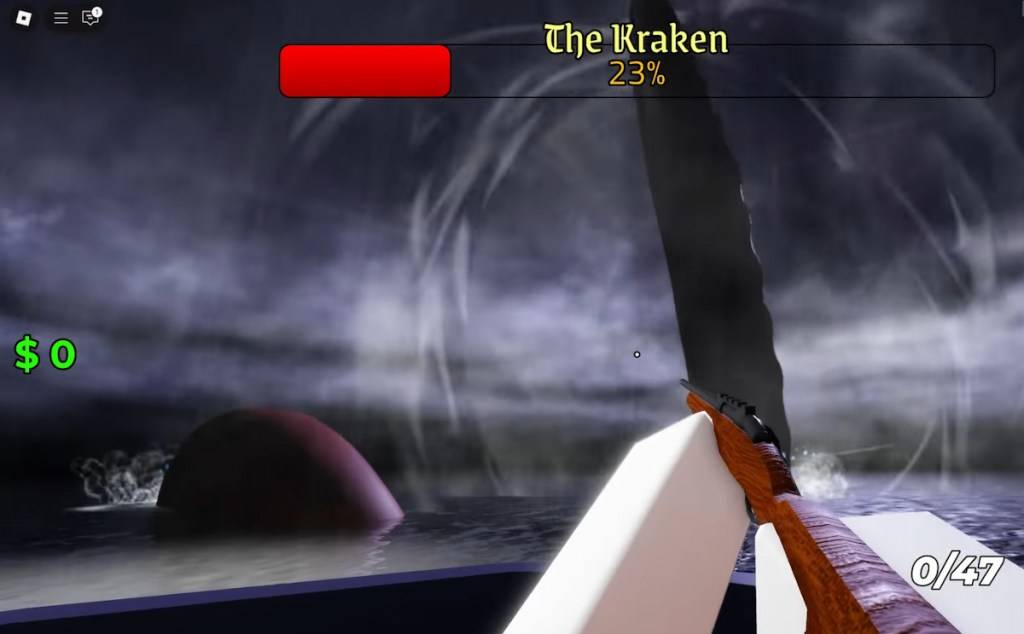
In the final safe zone, sell all your loot and stock up on ammo, weapons, and medkits. Don't go easy on Zombies and Drowned. Ensure you have at least 8-10 corpses for fuel during this crucial part of the Dead Sails Kraken guide. You're almost there. At around 100,000m, you'll reach open waters and be ready to face the beast. The sign of its approach will be the skies darkening.
 Screenshot by Destructoid
 Screenshot by Destructoid
When the Kraken emerges, everyone must choose a tentacle. The boss has significant health, and each tentacle attacks if not repelled. With five players, form a pentagram-like shape and tackle each tentacle individually.
 Screenshot by Destructoid
Be cautious of the water splash ability. It causes AoE damage and is signaled by the Kraken winding back its tentacle, creating a water trail. Use medkits generously, as some damage is unavoidable.
 Screenshot by Destructoid
Lastly, watch out for the Roar AoE, which inflicts minor unblockable damage and may slightly buff the boss's damage. You'll see it by the white concentric circles emanating from the tentacle.
 Screenshot by Destructoid
As you can see, defeating the Kraken is challenging but manageable. That concludes my Dead Sails Kraken Guide. To conquer the boss even faster, consider using one of our Dead Sails codes. Best of luck and smooth sailing!
-
 Tales of Bloomrise is now in soft launch on Android. Developed and published by Brazilian indie studio Minelli, this pixel-art RPG offers the cozy charm of small-town living, blended with dungeon exploration and adventure.Where to Download Tales of BAuthor : Eleanor Feb 12,2026
 -
 A versatile 2-in-1 laptop effectively serves as both a traditional notebook and a tablet. The top models provide a level of adaptability that standard laptops simply can't match. While they aren't typically designed with gaming as the primary focus,Author : Zoe Feb 12,2026
-
 GallantinDownload
 -
 Jet Fighter Airplane RacingDownload
 -
 Demon Hero season2: Idle RPGDownload
 -
 BC Monster Dinosaurs That Time Forgot Slots FREEDownload
 -
 Pirates Flag-Open-world RPGDownload
 -
 Shooting Master : Sniper GameDownload
 -
 BillionaireDownload
 -
 Orbit PlanetsDownload
 -
 Cargo Truck Driving Game 2024Download
 -
 Mystical MixingDownload


- Stardew Valley: How To Befriend Willy
- DISCOVERY CHANNEL TO UNVEIL CROSSOVER IN 'Reverse: 1999' 2.0
- Crunchyroll Game Vault adds Battle Chasers: Nightwar, Dawn of the Monsters, Evan’s Remains and more
- Hotta Studio's Open-World RPG, Neverness to Everness, Announced
- Military Strategy Game Warpath Launches a Navy Update with 100 New Ships
- Half-Life 3 Speculations Spark Again as Risk of Rain Original Devs Join Valve's Game Dev Team